Thursday, September 5, 2013

New Seasonal Burlap Wall Prints Now Available!

If you know me, you know I LOVE all things seasonal and holiday related!  That is why I'm so excited to unveil my latest burlap wall prints.  I've started with fall, Thanksgiving, and Christmas but the possibilities are endless!  I love that these prints provide an easy way to update your décor based on the season or holiday.  I hope you enjoy!


Tuesday, August 6, 2013

Tutorial: Fabric Covered Magnetic Memo Board


Supplies Needed:

·        12”x18” Zinc-Plated Metal Sheet (available at hardware stores)
·        Fabric (at least 16”x22”)
·        Ribbon (about ½ yard)
·        Glue gun
·        Glue sticks
·        Hammer
·        Large Nail
·        Iron
·        Ruler (optional)
·        Tape (optional)

Instructions:

1.      Iron fabric to smooth any wrinkles.
2.      Lay fabric face down.
3.      Position metal sheet in the middle of the fabric.
4.      Start with any side and fold the fabric until it meets the metal sheet and iron a crease along the fold.
5.      Run a bead of glue on the metal sheet on the same side with the folded fabric.
6.      Fold the fabric onto the line of glue and press firmly (be careful not to burn yourself).
7.      When the glue is set (or cool), repeat steps 4 through 6 for the opposite side of the metal sheet (be sure the pull the fabric taut).
8.      Repeat steps 4 through 7 for the remaining two sides but when you fold these sides fold the corners in like a package for a finished, mitered corner look.
9.      Next, you will attach the ribbon which will be used to hang the board.  Measure about 2” down from the top of the board and measure about 4” from each of the sides and hammer the nail through the board to create holes for the ribbon.  Be sure to hammer the nail from the front of the board and out the back of the board.  Once the nail has created a hole, turn and press the nail to enlarge and smooth out the hole.  Remove the nail.
10.   Thread one end of the ribbon through one of the nail holes and tie a knot in the ribbon (the knot should be on the back side of the board).  When threading the ribbon through the hole, insert the ribbon in the front of the board and pull the ribbon out the back side of the board.  If you have difficultly threading the ribbon through the hole, wrap the end of the ribbon in tape like a shoelace.
11.   Repeat step 10 with the other end of the ribbon and the other nail hole.  Your magnetic memo board is now ready for wall hanging!

Thursday, July 11, 2013

If you like what you see, vote for me!

Each year, Martha Stewart Living hosts the "American Made" awards, a contest which celebrates small businesses that create handmade products in America.  I'm an American Made audience choice nominee.  If you like what you see on my blog and in my Etsy shop, please check out my American Made profile and vote for me!  Thanks!!

 
Martha Stewart - American Made 2013 - Nominee Badge

Saturday, June 22, 2013

New Products: Burlap Wall Prints!

I'm so excited about my new burlap wall prints!  Anyone who has ever visited my house knows that I love a good quote and I love to display them on the wall.  So, this new venture was a natural progression for me.  Here are a few of my new wall prints.  If you like them, be sure to vist my Etsy shop!


Tuesday, April 9, 2013

"You are My Sunshine" Yellow & Gray Kitchen Remodel

It's finally done!  I have been dreaming of painting my golden honey oak cabinets and trim for years and I finally conjured up the gumption to do it.  Now that it's done, I just wish I would have done it sooner.  It took me three weeks of naptime (that's the Little Man's naptime, of course) painting to complete this project and now my yellow and gray kitchen "makes me happy when skies are gray!"


Here's a little rundown of the project:
  • I painted the trim throughout the kitchen, breakfast nook, hallway, and powder room. I used Behr Premium Plus Self-Priming Interior Semi-Gloss Enamel in Ultra White.  It took three coats to cover the old oak trim. 
  • I painted the walls in all the above mentioned rooms.  I used Valspar Signature Paint + Primer in one.  The color is Soft Sunlight and then sheen is eggshell.  The walls took two coats.  I really like this shade of yellow.  It's buttery, not pastel or mustard.
  • I painted the cabinets with Annie Sloan Chalk Paint in French Linen (two coats) and finished them with Annie Sloan Clear Wax (two coats).  I can't tell you how much I love this paint.  It doesn't require any sanding or priming and it dries so fast.  LOVE!  If you're local to the Richmond, VA area, check out Thrill of the Hunt in Ashland.  That's where I bought my Annie Sloan paint and wax.  They have a great selection of Annie Sloan products and they're very helpful.
  • I painted the back and side of the long cabinet with Valspar Chalkboard paint (three coats) and primed with chalk.  I let the chalkboard paint dry for 24 hours between each coat and before priming with chalk.
  • My sweet hubby painted the door knobs with Rustoleum oil rubbed bronze spray paint.  They used to be brass (yuck!), now they're gorgeous and they match the light fixtures, curtain rods, and cabinet hardware.
The room feels so much lighter to me now.  I love the gray and yellow combination.  Below are some more photos from different angles.  Thanks for checking it out!


Linked up at http://www.savvysouthernstyle.net/

Thursday, February 28, 2013

Recent Projects

Here are a couple things I've been working on this week:

A custom frame inspired by Dr. Seuss' Green Eggs and Ham

A custom quatrefoil frame for a yellow & gray nursery

Tuesday, February 19, 2013

My Little Man's Big Boy Room Reveal

I recently posted a sneak peek of my little man's big boy room.  Well, now I'm ready to reveal the whole room.  My little guy is just over a year old but he just seemed too old for his owl themed nursery and since he's already exhibited a love of all things "wheeled," I decided to go with a transportation theme for his big boy room.  "All aboard" the room tour!

First Stop: Book Wall

I bought three inexpensive picture ledges from Ikea and used them as book shelves.  I love that you can see the artwork on the covers of the books and that, as Little Man grows, he'll be able to select books much easier than if they were stored on a traditional bookshelf.  I snagged the Route 66, oil can, and stop sign at Hobby Lobby when they were 50% off.  Have I mentioned that I love a great deal?!  To finish off the book wall I bought the custom road sign on Etsy for less than $15 shipped!

Speaking of great deals, I bought these Pottery Barn "vroom" letters from another mom on a local moms' buy/sell/trade site for $8.  They're hanging over the closet door.

Next Stop: Art Series
If you read my blog or check out my Etsy shop, it's no secret that I love chevron.  It's a great print to use in a little boy's room.  So many prints come off very feminine but chevron is completely neutral.  My DIY wall art prints showcase the navy and lime color scheme for the room.


I bought these inexpensive white frames at Michael's.  I cut the transportation themed images using my Cricut machine and I used chevron fabric as the background.  This was such a simple project but I think it has the most impact in the room.  There is a series of seven prints in the room.  See the rest below.  I think the dump truck is my favorite.  I wonder which one will be Little Man's favorite? 

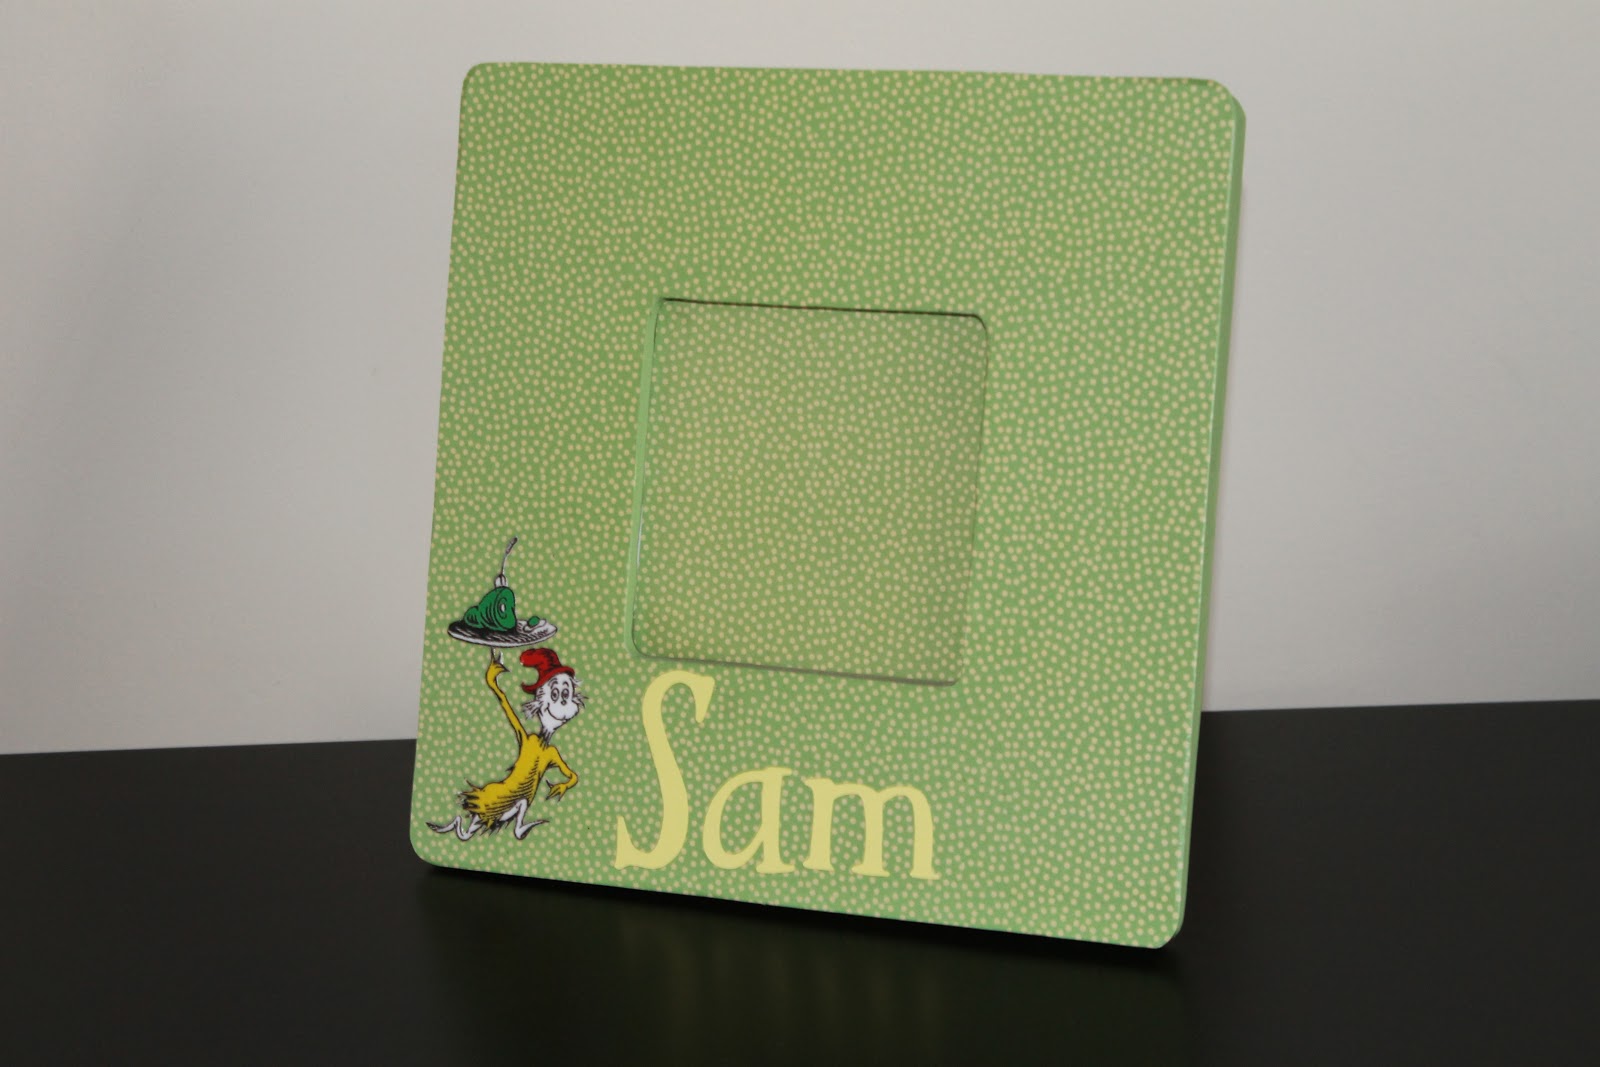
In my Etsy shop, I specialize in custom personalized frames so Little Man's room had to have one!  I love this train print paper.

Here are a couple more of the prints in the series.  Below the prints hangs a custom shelf my nephew made in shop class for my little man.  Isn't that sweet and crafty?!  I picked up the hood ornament clock at the Hobby Lobby 50% sale and my MIL bought the name train for Little Man before he was born.


I recovered these wall letters from Little Man's nursery in blue stripe, train print, and lime stripe papers to coordinate with the new room.

This corner shelf was also already in Little Man's nusery.  I just added a couple of airplanes and now it's at home in the new room.  I bought this shelf at a local thrift store for $10.

The final two wall prints.  I'm not sure if it's clear in the picture but the bottom one is a bike.  The lamp on the table is an upcycled lamp I picked up second hand.  Check out my previous post for before & after pics (http://magnoliamommymade.blogspot.com/2013/02/sneak-peek-big-boy-room_8.html).

My parents bought this adorable gas pump piggy bank for Little Man.  Hopefully, he's a saver, not a spender!!

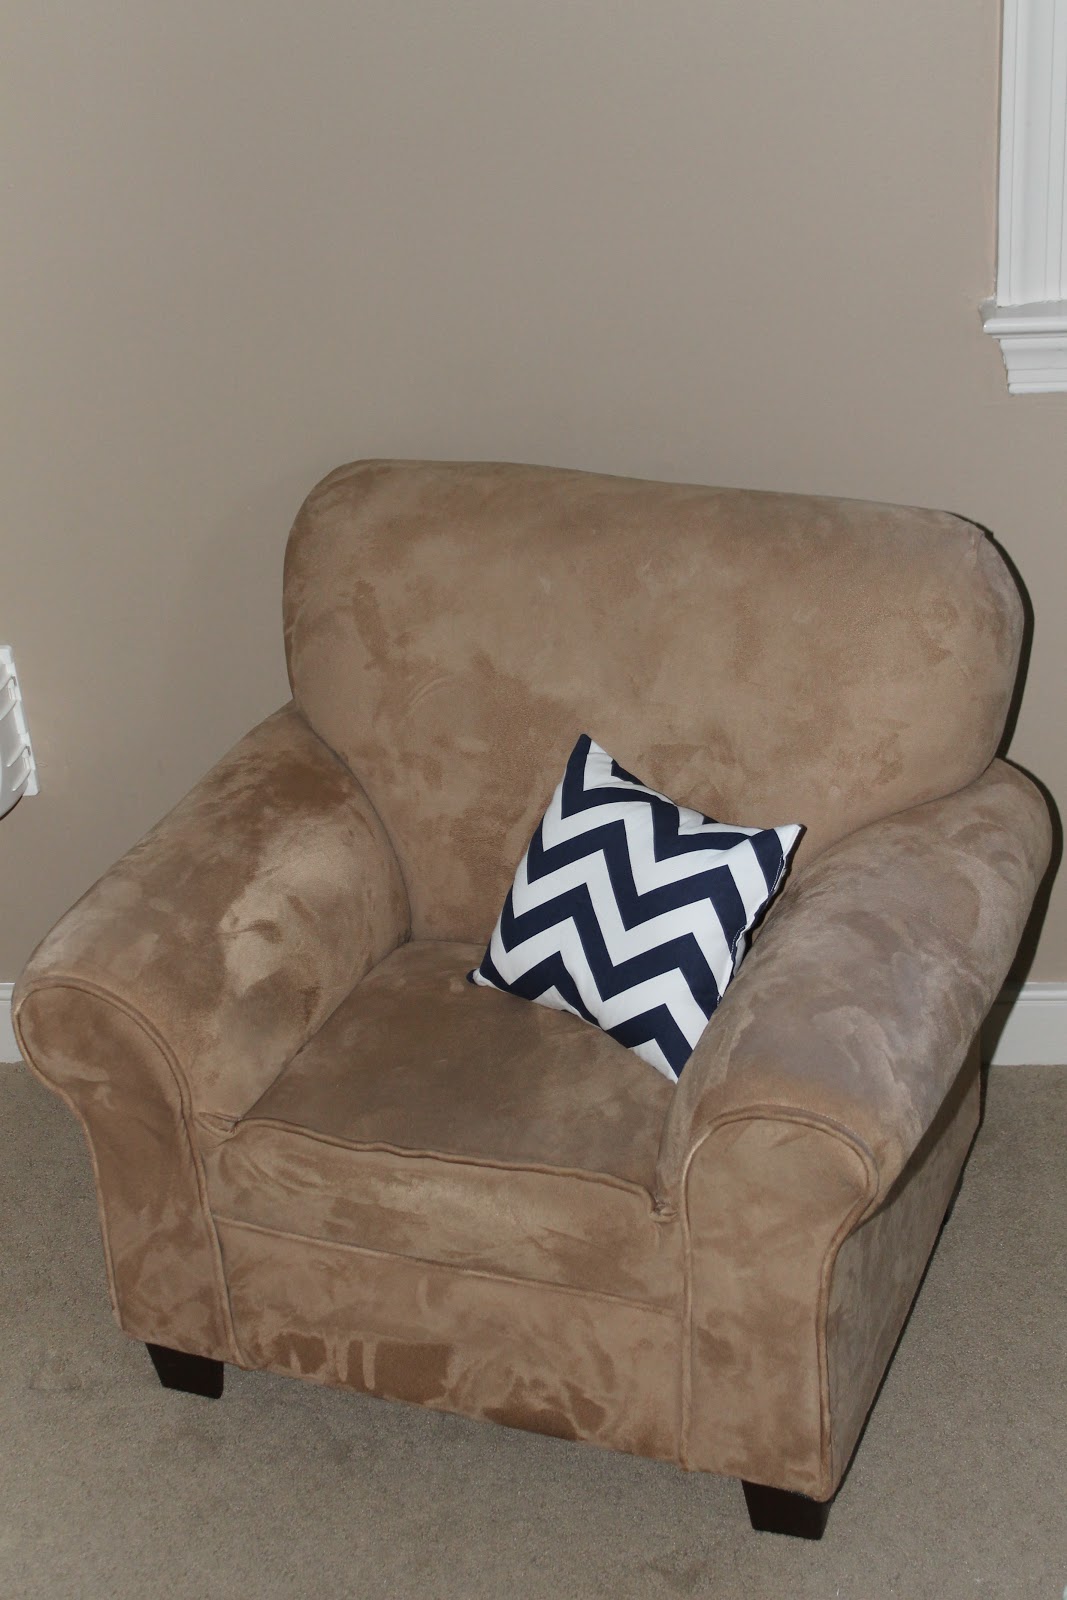
Next Stop: Mama & Daddy Bear Chair
I made a new cover for the throw pillow using the same navy chevron fabric that I used for the wall prints.

Final Stop: Baby Bear's Chair
I made a matching pillow for Little Man's little chair.  He loves this little pillow!
 
I hope you enjoyed the tour of my Little Man's new big boy transportation themed room.  I spent less than $100 on this redesign!

Friday, February 15, 2013

New This Week

I love working on custom frames and especially frames for children.  This week I had the opportunity to work on a few baby shower gifts and I had a great time!


Friday, February 8, 2013

Sneak Peek: Big Boy Room

My little man is 13 months old and I know that doesn't sound like a "big boy" but he just seems like he's outgrown his owl themed nursery.  He has also begun to demonstrate a strong affinity for cars, trucks, and "all things wheeled."  The shift coupled with my love for redecorating means Little Man is getting a big boy transportation themed room.  I will unveil the entire room soon but I wanted to give you a sneak peek of one of my favorite projects in the room. 

I bought this airplane lamp on a local moms' buy/sell/trade Facebook page.  I love the airplane shape but I wasn't a big fan of the colors (the new room is lime and navy) and I was not in love with the tappered shade.  Also, I want Little Man's new room to be one that grow with him (even though I'm sure I'll get the itch to redecorate it in a couple years) and one with a modern flare.  So, with a new drum shade (under $5 with a coupon at Hobby Lobby), some cute chevron fabric, navy ribbon, and a trusty can of white spray paint, I transformed the lamp!